Saturday, March 29, 2014

SUITS - INTERIOR INSPIRATION BOARD

Hi!

Everyone has their favourite TV shows, whether be it comedy, reality, drama, or the obscure.  One show that we watch religiously is a show on the USA Network called SUITS.  The show centres around a top New York law firm, Pearson-Spector and the lawyers that work there.  The show is witty and suspenseful. Without giving away too much of the plot, let's just say we have both been hooked since the first episode and have been loyal viewers ever since.  After the most recent episode we were both drooling over the interior design of an apartment room featured on the show which sparked us to create our inspiration board for our future home.


PHOTO: Screen Capture of Mike Ross and Rachel Zane's newly decorated New York apartment on the hit show SUITS.

It has always been a dream of ours to own our own house some day, but for now all we have is wishful thinking because we are broke students.  Instead we like to window shop or in this case online shop and put it on an inspiration board.  It is no secret that we both have an appreciation for all things mid century (Mark talked about this in his previous post).  A modern dwelling does not need to be so harsh and sterile, paint can do wonders to a room. A feature wall with a large piece of art can make a room look hip and very modern.

As for furniture we both agree that mixing and matching of several textiles create a "homeyness" to any room, similar to Mike Ross and Rachel Zane's apartment on Suits.  The mixture of teak furniture like a vintage sideboard, and even this IKEA end table would be great additions to any modern home.  We think the key to a well rounded home is to play with different textures and experiment.  Working with tailored pieces like this leather Eames lounger, Butterfly chair by CB2 and Barcelona Bench are great statement pieces, both of which are definitely on our wish list!

We really enjoy natural light and so windows are essential and Ashley is making it mandatory to have a bay window in our home not to mention a claw footed tub in our bathroom.  For artificial lighting we really like this George Nelson bubble lamp pendant for over a kitchen table along with an oversized floor lamp we saw at target for the living room.  Who said that interior decorating needed to be expensive anyway?

Check out our inspiration cork board below! Tell us about your idle home, we would really love to read about it, comment in the comment section below.


  1. Paint sample swatch, pops of colour, Benjamin Moore
  2. George Nelson Bubble Lamp Pendant - Design Within Reach
  3. Claw foot tub, Restoration Hardware
  4. Oversized Architect floor lamp, Target
  5. Vintage teak side board
  6. Eames Lounger, EQ3+
  7. Lövbacken end table, IKEA
  8. Barcelona bench, Design Within Reach 
  9. Butterfly chair, CB2
-M&A

Wednesday, March 26, 2014

DIY: APC X KANYE HOODIE

HI,

All week I have been hearing about Kanye West and Kim Kardashian and their spread on American VOGUE.  It got me thinking; Why are so fascinated with their relationship? Who knows.


PHOTO CREDIT: UPSCALE HYPE

I have always been a fan of Kanye West (especially his fashion sensibility).  It was not too long ago that he did a collaboration with french design house APC, known for their cutting edge street style designs they definitely caught the attention of many including myself.  One piece that caught my eye and what this DIY is inspired by is the "APC X Kanye West Hoodie" it features a slouchy fit hoodie with side zippers (pictured above).  The only thing is this sweaters retails for $280 USD! Being a student you guys can imagine that budgeting is a reality and I could not see myself breaking the bank on such a simple hoodie.  So I decided to make one instead.  All-in-all this hoodie only costed me less than $20 and did not take me very long to do!  The great thing is that you can customize it to your liking, ie. the colour of the side zipper, hoodie, draw string color.  I learned how to create this DIY (with some minor tweaks of my own) from GearedTowardGear Youtube video.

HERE'S WHAT YOU NEED
  • Pullover Hoodie
  • 2 X 7 inch zipper (denim)
  • Chalk
  • Tape Measure
  • Scissors
  • Sewing Machine
  • OPTIONAL: Parachute Cord (60 inches)
  • Lighter

INSTRUCTIONS

Sleeves
  1. Lay hoodie flat onto working surface.  Making sure all side seams and sleeves are flat
  2. Measure 11 inches from the left shoulder seam and mark using chalk
  3. Using your scissors cut a straight line from marked area.  
  4. Preform this step to the right shoulder seam. 
  5. Roll the newly cut sleeves and roll approximately 1-1.5 inches, three times
  6. Try on the sweater to see if the length of the sleeves are even and the look is to your liking
  7. Optional: I had access to a sewing machine and was able to hem the cut ends of the sweater, giving a tailored look.
Side Zippers
  1. Once you are content with the sleeves, move onto attaches the side zippers
  2. Lay hoodie flat onto work surface.  Making sure all side seams are flat.
  3. Working from the bottom left side of your sweater measure out 6 inches and mark with chalk
  4. Cut along the seam vertically making sure it cut is very straight
  5. Attach zippers using a sewing machine. NOTE: Fabric glue will work just as well!
  6. Do steps 1-4 for the bottom right side of the sweater
Optional Draw String
  1. Using a safety pin, attach one end of the parachute cord to the existing draw string on the hoodie
  2. Pull on the non-attached end, feeding the parachute cord until it completely around the hoodied slot.
  3. Using a pair of scissors cut the parachute cord ~60inches
  4. Burn the ends using a lighter, this reduces any potential fraying of the cord
  5. Tie a simple not around both ends of the cord


OOTDBeanie - F21, Sweater - DIY, Tank - Fruit of the Loom, Jeans - Cheap Monday, Boots - ALDO

I really hope you guys enjoyed this DIY, comment in the comment section below if you have any questions about where I got all the materials!  We would love to know how your sweaters turned out!

-M

Sunday, March 23, 2014

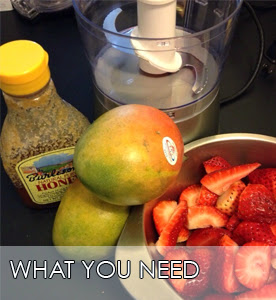
NATURAL FRUIT ROLL UP

"Don't just fall in love with the result; fall in love with the process. For when you fall in love with the process, the results take care of themselves" - unknown. 

At first clean eating wasn't easy, but I've learned a lot about food this past year and the proper way to combine certain foods based on their pH and their absorption in the body. I've slowly grown to enjoy cooking and making sweat treats that aren't full of high fructose corn syrup. I recently discovered how simple it is to make "fruit roll up" with just fruit!


MANGO FLAVOUR
Ingredients
  •  2-3 mangos
Method
  1. Peel and cut the mangos and place them in a food processor
  2. Line a baking tray with parchment paper and spread the mango puree as evenly as possible (note: if you have a lot of puree, use 2 baking trays because a thinner layer is better than a thicker one)
  3. Add 4 tbs of raspberry or strawberry puree for aesthetic appeal*
  4. Bake at 175ºF for 3-4 hour
*optional

STRAWBERRY FLAVOUR
Ingredients
  • 6oz. container of strawberries
  • 1/2c honey*
Method
  1. Wash and dry the strawberries and cut the stems off
  2. Puree strawberries and add honey if desired
  3. Line baking sheet with parchment and spread evenly
  4. Bake at 175ºF for 3-4 hours
After baking, the "fruit roll up" should have a tacky consistency (Quick tip: If there are parts that still have puree keep baking it). Let it cool and roll the "fruit roll up" in the parchment.  Cut it into 1" rolls and enjoy! These can last 1 week in an air tight container.


-A

Wednesday, March 12, 2014

JETS VS. CANUCKS


This game was EPIC! If any of you guys out there know Canadians, you would understand why this post is very patriotic.  Hockey is a beloved sport in our country, and this evening I was able to a score some tickets (along side three close friends) for a coveted game between The Winnipeg Jets (my home team) and Vancouver Canucks at the MTS Centre.

This would mark my very first NHL hockey game since the Winnipeg Jets came back to Winnipeg, and let me tell you, they certainly did not disappoint.  During the first period I got the impression that many of the fans were tense (judging the awkward silence) it was evident that many were banking on a win.  I cannot blame them as this game really meant a lot for the team.  Currently, the Jets are vying for the last coveted spot on the NHL 2014 Western Conference Playoff roster.

There were so many highlights, too many to list off.  Here are but a few things that stood out:

  • The MTS really delivered when it came to venue.  The whole stadium was decked out in all Jets not only did the fans come out in full Jets gear but the donuts at Tim Horton's, Canada's prized coffee and donut shop did as well.  
  • My best friend R.A. and I had heard all about this so called, "Jumbo Jets Dog" and really wanted to try what it was about.  Well let me tell you, It certainly lived up to all the hype, definitely worth the 15 minute line up.  
  • What makes it so special you ask?  To be honest I am not a big hot dog fan to begin with but this hot dog was nothing I have ever seen let alone tasted before.  It was triple the size of a normal hot dog and came with INTERESTING condiment choices.  Along with your normal ketchup, onion, relish, mustard, etc. you also had the choice of PEROGIES, CHILI, AND/OR NACHO CHEESE.  So I ask you what is not to love about this... SERIOUSLY they got me at PEROGIES!  Definitely a highlight of the night.
  • The various chants that went one all the way through the game were hilarious.  The game was a very "dirty" game, a lot of slashing and fighting among players.  This caused several controversial calls by the referees which did not sit well with the Jets Fans, including myself. Chants like "YOU SUCK REF" and "YOU STILL SUCK [REF]" could be heard through the MTS at several segments of the game, definitely a "you gotta be there" kinda moment.  

Both the Jets and the Canucks fought a valiant fight on the ice.  Though, the Canucks had a slight edge with goal attempts the Jets were able to tie up the game and go into OT which then lead to a Shoot out. NAIL BITER.  Unfortunately, we did loose in the shoot out but it was a great effort by the Jets.

ALL-IN-ALL:

  • I gauge the enjoyment of sporting events on one thing; DID I loose my voice?
  • The answer: HECK YES! 

It was such an awesome experience.  If you have the opportunity to attend an NHL hockey game, especially at the MTS Centre in Winnipeg then I highly recommend it!! GO JETS GO!


PHOTOS: 
TOP L: Jets Donuts at Tim Hortons TOP R: The Jumbo Jets dog (hardly fits in the frame, and yes those are PEROGIES) MIDDLE L: Going into OT MIDDLE R: Among friends (RA, Tracy, Me, Justin) BOTTOM: Full house at the MTS STADIUM

-M

Sunday, March 9, 2014

MID-CENTURY

Hey guys,

I am going to try and post new content on the blog first of every week.  Keeping you posted on what I am doing or anything interesting that comes my way.

For many years now I have been very interested in the Mid Century aesthetic.  This style of design stems from the early 60s.  Think AMC's Mad Men, what Don Drapper would put in his office/home. Coincidently, Mad Men tops my must watch series on television.   There is just something about how the show is written that allures me to watch.  I guess you can say that maybe in my past life I was born in that era.

Winnipeg has become more and more welcoming to this type of design.  For my birthday Ash picked me up a new print from Tiny Feast, a little stationary shop in the Exchange District.  The print depicts Winnipeg in the 1950s shaped like a heart and has an Aristotle quote beneath it.  I found it simple and understated.  Minimalism at its best.  I framed it with an inexpensive frame from IKEA and viola!  I absolutely love it.  It is hung above my vintage Herman Miller Eames Arm chair I picked up a few years ago.  This chair is arguably a mid century enthusiast staple.  Here is a snap shot of how it look. Perfect in a little corner of my room.  Hope you guys have a wonderful week.

- M

Sunday, March 2, 2014

HOW TO DE-LINT YOUR CLOTHES

A big difference between Mark and I are our styles. I am way more carefree and could careless what outfit I wear, whereas Mark is your typical GQ kind of guy. I drive Mark CRAZY when I wear old bally sweaters or jackets and one day he finally snapped. He made me take off my bally sweater, grabbed a razor and started shaving off the little balls. I couldn't believe what a difference it made, my sweater looked brand new. I tried this myself and it took me no longer than a few minutes so give it a try!

 WHAT YOU WILL NEED
  1. A bally clothing item
  2. Razor
  3. Lint roller
STEPS
  1. Take the razor and shave downward. Start at the top of a sleeve or top area of a corner and continue downwards (DO NOT STROKE FROM BOTTOM TO TOP). Keep doing this in small areas at at time
  2. Take a lint roller and remove any fluff
  3. Continue steps 1 and 2 on the back and front of your item

-A

BUTTERSCOTCH LATTE

Hello again, it has been a very long winter in Winnipeg. I read in the paper the other day that it has been a record long winter compared to the last 35 years! I am sure Winnipeggers are beginning to become stir crazy in their homes, so here is a treat to cheer you up!

Tid Bit - Everyone who knows me can tell you how much I enjoy drinking coffee, Ash gifted me this awesome Keurig machine last Christmas, which took this addiction to the next level so to speak -  thanks babe!

WHAT YOU NEED
  • Keurig machine (or you can use a french press using your favourite coffee)
  • Coffee K-CUP (I used a Starbucks House Blend)
  • Milk frother (I got mine from IKEA)
  • 10-15 Butterscotch chips
  • 2/3 cup Half and Half
  • Double walled cup (optional)
INSTRUCTIONS
  1. Start by adding Half and Half into a sauce pan and warm it over a stove top under low to medium heat until it simmers - don't let it boil
  2. Remove the milk from the heat and add Butterscotch chips (you can always add extra if you want your latte extra sweet, but I'm sweet enough so I didn't add extra :P) to the warm milk and let the chips melt while stirring occasionally
  3. Add half of the warm Butterscotch/Milk liquid into the double walled cup and place it into the pan of the Keurig machine
  4. Following the steps of the Keurig go ahead and place the K-CUP and brew to the "Medium" cup setting
  5. Once brewed add the rest of the Butterscotch/Milk liquid
  6. Using the Milk Frother, Froth the contents of the cup until a desired level of foam is achieved, enjoy!


Stay warm and hope you enjoy!

-M

Saturday, March 1, 2014

COOKIE DOUGH BITES WITH A TWIST

I was craving something sweet after a long study session, but also something that would fuel me with some energy and what better study snack than COOKIE DOUGH! These took me no longer than 10 minutes to make and the variations are endless. This recipe was inspired by Jane Lim's blog, "Eye It Try It."


Ingredients 
  • 2/3 cup whole cashew nuts
  • 1/3 cup oats
  • 2 Tbsp Agave syrup
  • 1 Tbsp maple syrup
  • 1 tsp vanilla (optional)
Method
1. In a blender combine cashew nuts and oats. Combine until they start to stick together, but don't over blend or you will make cashew butter.
2. Add wet ingredients and blend for 1 minute. I like to hand mix after blending to make sure the ingredients a the bottom of my blender are incorporated.
3. Add chocolate chips and mix by hand.
4. Roll cookie dough into small balls.

Baking tip
If the dough is too warm and difficult to work with place dough in the freezer for a few minutes


  Variations
  • Add coco powder to mixture to give it a chocolate taste OR you can roll balls in coco powder to give it a chocolate truffle look
  • Roll it in shredded coconut
  • Create an indent in the centre of the ball and fill it with greek yogurt or jam
  • Add try fruit instead of chocolate chips
  • Dip it in white or dark chocolate

SIMPLE & HEALTHY STIR FRY

Hi! I only had 30 minutes before I had to head out to work and I didn't have anything pre-made for lunch so I thought I would whip up a stir fry.... and it surprisingly turned out alright :)

Ingredients
  • Quinoa
  • Balsamic
  • Vinegar
  • Chicken broth (or vegetable broth)
  • Peppers 
  • Onion (not show in picture)
Method: cook your quinoa following the instructions at the back of the package, but instead of using water use your broth of choice. Dice your peppers and onions and sauté them in a pan. Add balsamic vinegar to the pan and add any additional seasonings (I added Mrs. Dash Original Seasoning). Once your quinoa is cooked add your sauté and enjoy!

Cooking tip
Cutting peppers-  I find it best to cut a circle around the stem of the peppers and pull the top part out. This works great for pulling all the seeds out at once.


-A